NFTs have quickly grown from a niche concept to a major force in the art world, enabling creators to connect with collectors in new ways. While the market has seen its ups and downs, there’s still plenty of room for innovative generative NFT collections. By blending unexpected traits with artistic flair, these projects offer something unique—no coding background needed. Dive into this guide to see how you can bring your own collection to life.
What You Will Learn
Here’s what to expect from this generative NFT tutorial:
-
How to pick the right no-code generative art platform.
-
How to prepare your artwork by creating layers (like background, characters, and accessories).
-
How to launch your NFT collection quickly on popular marketplaces such as OpenSea or Rarible.
We’ll focus on tools that remove the need for programming. That means you can focus on making art people love rather than fussing over code.
Why Go No-Code?
If you’re an artist or creative individual, dealing with code can be a big hurdle that diverts your attention from your true passion. By using no-code platforms, you can skip complex programming tasks and mint your NFTs much faster.
This approach also spares you the challenging learning curve of writing custom smart contracts. In essence, you can concentrate on perfecting your art while the platform takes care of all the behind-the-scenes technical work.

Understanding Generative NFT Art
What is Generative Art?
Generative art involves mixing and matching design elements in different ways to create a unique NFT outcome for each piece. Think of it like a digital slot machine that randomly picks traits—such as color, background, or accessories—and assembles them into fresh combinations. When these artworks are turned into NFTs, each token reflects a one-of-a-kind blend of those traits.
NFT layering is a term you’ll often hear. It refers to how you stack different assets (like eyes, hats, or clothing) on top of each other to form a final image. By assigning different rarity levels to each trait, you can create valuable, limited-edition pieces within your collection.
The Value of Generative NFT Collections
Collectors are attracted to scarcity and variety. A large project might have thousands of pieces, but each one is distinct, thanks to random trait generation. Projects like Bored Ape Yacht Club and CryptoPunks demonstrated how highly people value limited sets of unique designs. These early successes paved the way for other artists who want to jump in and give fans something fresh to collect.
Common Misconceptions
-
“I need to be a developer to create generative NFTs.” Not anymore! No-code platforms make it accessible for anyone with a creative streak.
-
“It’s too expensive to get started.” While you do need to consider minting fees, there are many cost-effective tools and even blockchains with lower transaction fees.
-
“Generative projects are too complicated.” Yes, they can be, but if you break them down into clear steps—it’s easier than you might expect.

Overview of No-Code Options
Today, the landscape of generative NFT art tools is growing rapidly. Several platforms have emerged to meet the demands of creators who would rather not tinker with code. Many websites and apps now feature user-friendly dashboards, drag-and-drop interfaces, and clear step-by-step instructions, making the creation of generative NFT art accessible to anyone.
Top Platforms to Explore
-
-
Key Features: Creates collections on Ethereum or Solana, and supports images, GIFs, and videos.
-
Why It’s Great: Focus on the creative aspects without worrying about any complicated code.
-
Ideal For: Artists who have different types of media and want quick blockchain integration.
-
-
-
Key Features: Pre-built templates, easy-to-use interface for people with no coding background.
-
Why It’s Great: Makes the design process smooth, offering a visual approach to building your NFT layers.
-
Ideal For: Beginners who need a straightforward tool to transform digital art into NFTs.
-
-
-
Key Features: AI-powered tool that converts art into NFTs fast.
-
Why It’s Great: Offers various art styles, effects, and can speed up the creation process.
-
Ideal For: Creatives who want quick results and an array of visual enhancement options.
-
-
-
Key Features: Combines augmented reality (AR) and AI to help you create and sell unique digital artworks.
-
Why It’s Great: The AR component adds a fun twist, and again, no coding required.
-
Ideal For: Artists looking for an immersive way to generate their NFT art.
-
-
-
Key Features: AI-powered software with tools to help spark fresh ideas.
-
Why It’s Great: You can generate custom NFT art directly on the site without leaving your web browser.
-
Ideal For: Creators who want AI-driven assistance in brainstorming or finalizing designs.
-
 Source NFT Art Generator
Step-by-Step Generative NFT Art Tutorial
Prepare Your Artwork Assets
Before diving in, prepare the pieces of your artwork. Think about each visual layer:
-
Background: Solid colors, gradients, or simple patterns.
-
Character or Main Subject: This could be your “base” figure if you’re doing characters.
-
Accessories & Details: Hats, eyes, mouths, and so forth.
Pro Tip: Name your files clearly (e.g., “Eyes_Green.png,” “Hat_Red.png”). Keep them in tidy folders so you know exactly what goes where.
Set Up Your Project on the Chosen No-Code Platform
-
Registration & Setup: Create an account on your chosen platform.
-
Project Dashboard: Once logged in, you’ll see a dashboard where you can start a new project. This is typically where you upload your art layers and configure project settings.
Uploading and Layering Traits
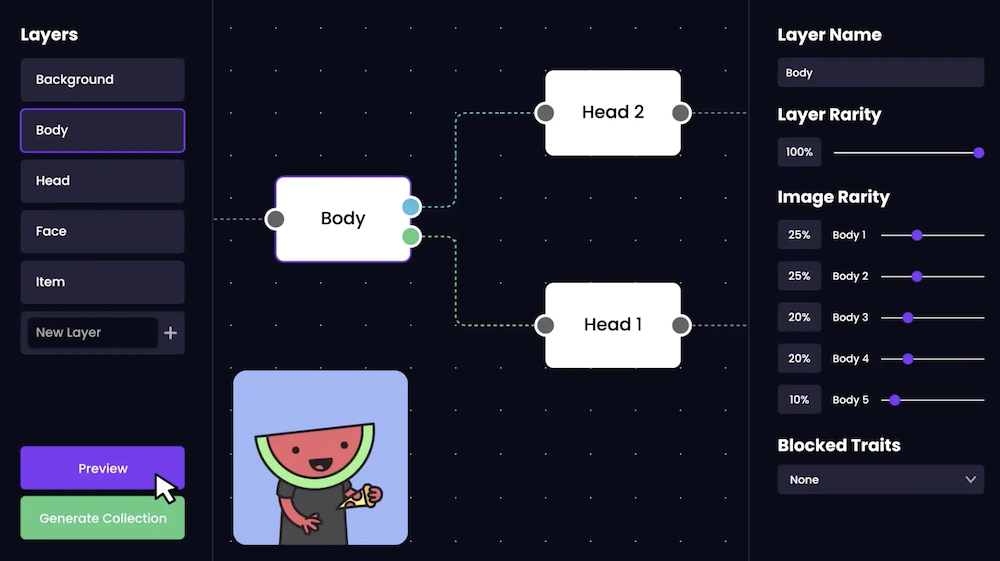
Your no-code platform will let you upload each trait layer separately. You then arrange these layers in the correct order. For instance:
-
Background
-
Character (base)
-
Clothing
-
Face Elements (eyes, mouth, etc.)
-
Accessories (glasses, hats)
Most platforms have a simple drag-and-drop feature to ensure everything stacks properly without overlapping in strange ways.
Configuring Rarity
NFT rarity configuration is where you decide how often a trait appears among the generated images. For example, if you want a “Golden Crown” trait to be super rare, you might set it to appear in only 1% of your collection. Balancing rarity is key to keeping collectors excited, as scarce items often become the most coveted.
Generating Previews
Once you’ve set up your layers and rarity levels, generate a batch of test images. Look them over to confirm everything looks right—no weird overlaps or unintended color clashing. If you spot issues, adjust your settings or fix layer alignments before finalizing.
Minting Your Collection
Minting is the process of turning your art into an NFT on the blockchain. Common steps include:
-
Connect a Crypto Wallet: Metamask is a popular option.
-
Pay Gas Fees (If Applicable): These are transaction costs for writing data to the blockchain.
-
On-Chain vs. Off-Chain Metadata: On-chain stores your images directly on the blockchain, which can be expensive. Off-chain uses services like IPFS to host your images, cutting costs.
-
Click “Mint” or “Generate NFTs.”
Listing & Launching
After your NFTs are minted, you’ll want to make them available to buyers. Popular marketplaces include OpenSea and Rarible, though you can also use a custom smart contract if you want more control.
-
Create a Collection Page: Upload a banner, add a description, and set a royalty percentage for secondary sales.
-
Double-Check Everything: Mistakes can be hard to fix once your collection is live.
-
Go Public: Share your collection link and start promoting on social media.

Troubleshooting & Common Pitfalls
Platform Issues
Sometimes you’ll run into glitches or slow loading times, especially if many people are using the platform at once. If your minting process stalls or you get error messages, contact the platform’s support team. Also, keep an eye on gas spikes (when transaction fees surge). You may want to wait if fees are too high at that moment.
Quality Control
Make sure traits align properly. Nothing frustrates collectors like hair that floats above a head or eyes that don’t line up. Double-check your NFT layering during preview generation. Also, ensure your metadata—like trait labels—matches what’s in the actual art file. Consistency is key to a professional product.
Security Concerns
-
Protect Your Wallet: Never share your seed phrase or private key.
-
Beware of Scams: Only visit official tool links from trusted sources.
-
Use Secure Networks: Avoid using public Wi-Fi for wallet transactions if you can.
Final Thoughts
Starting a Generative NFT Art collection can be really exciting. It mixes your creativity, the support of a community, and the thrill of new technology—all without requiring coding skills. If you have any questions or want to talk about your own experience, feel free to connect on social media. Hearing about other people’s adventures with generative NFTs often sparks new ideas for everyone involved.
By following these steps, you can bring your collection to life, attract collectors with unique artwork, and begin carving out your space in the growing world of blockchain art. Take it one step at a time, experiment with different approaches, and remember that this is just the beginning of your journey into generative NFT creativity.
Editor’s note: Written with the assistance of AI – Edited and fact-checked by Jason Newey.
If this article, video or photo intrigues any copyright, please indicate it to the author’s email or in the comment box.

